Screenshots use sample data and show the iPhone app. The Android app works the same way.
1. Getting started
- Install ReceiptWorks from the App Store (iPhone) or Google Play (Android), or visit receiptworkspr.com.
- Open the app. A short welcome explains the basics. You can see it again anytime in Settings → Welcome to ReceiptWorks.
- Start right away — no account needed. The free trial includes 20 scans and 1 export, and your records are saved on your phone.
The bar at the bottom of the app has three tabs:
| Tab | What it's for |
|---|---|
| Transactions | Your receipts, deposits, and payments — add, search, filter, and open them |
| Analytics | Charts of your spending by week, month, or year |
| Settings | Subscription, currency, workspaces, help, and your account |
At the top of Transactions are buttons for Workspaces, Projects, Spending Categories, and Export.
2. Adding a transaction
On Transactions, tap +. Choose how to add the receipt — the camera or a photo from your gallery — and pick the type: Receipt, Deposit, or Payment. You can also type everything in by hand.
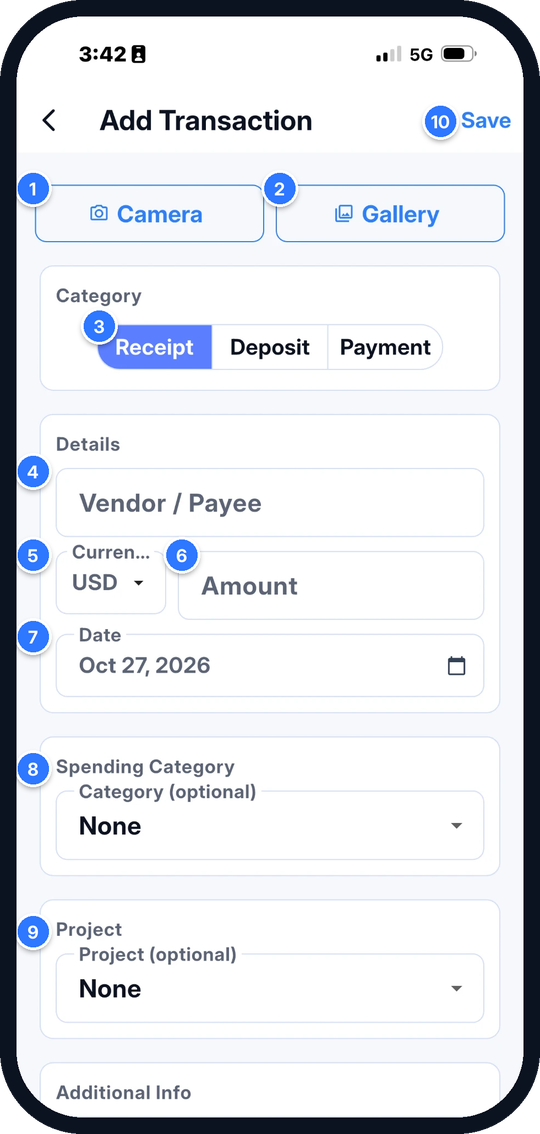
- Camera — scan a paper receipt
- Gallery — use a photo you already have
- Type — Receipt, Deposit, or Payment
- Vendor / Payee
- Currency
- Amount
- Date
- Spending category
- Project (optional)
- Save
3. Scanning with the camera
- Tap Camera. The first few times, a tip reminds you how far to hold the phone: 10–12 inches (25–30 cm) — about a forearm's length.
- Frame the receipt and hold still. Its edges are found automatically. For a long receipt, step back until the whole receipt fits.
- Tap the shutter, then Done. ReceiptWorks reads the details for you.
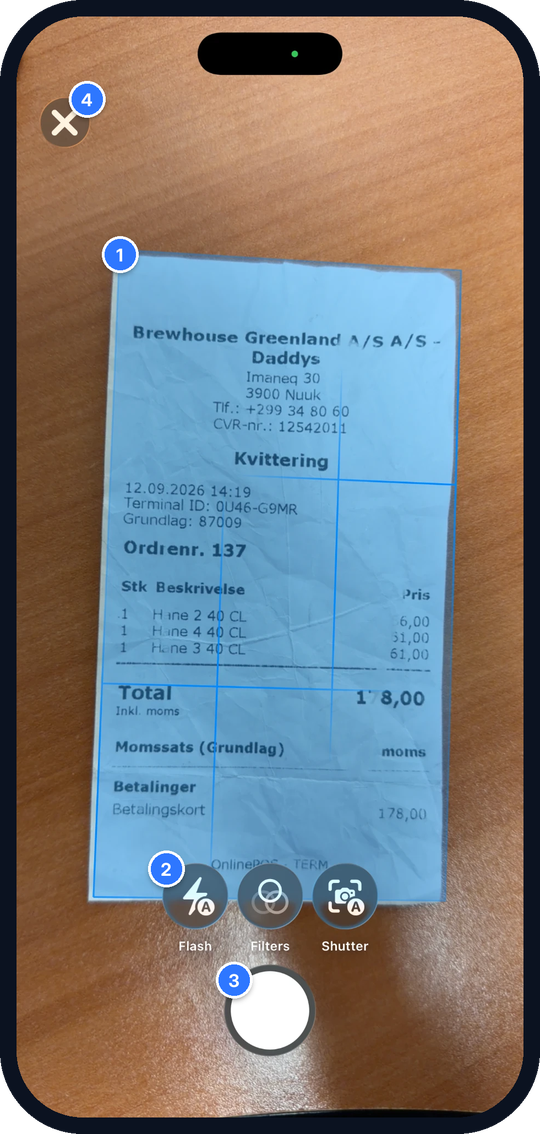
- The receipt is outlined in blue when it's found
- Flash — Auto turns it on in low light
- Take the photo (auto-shutter can take it for you)
- Cancel
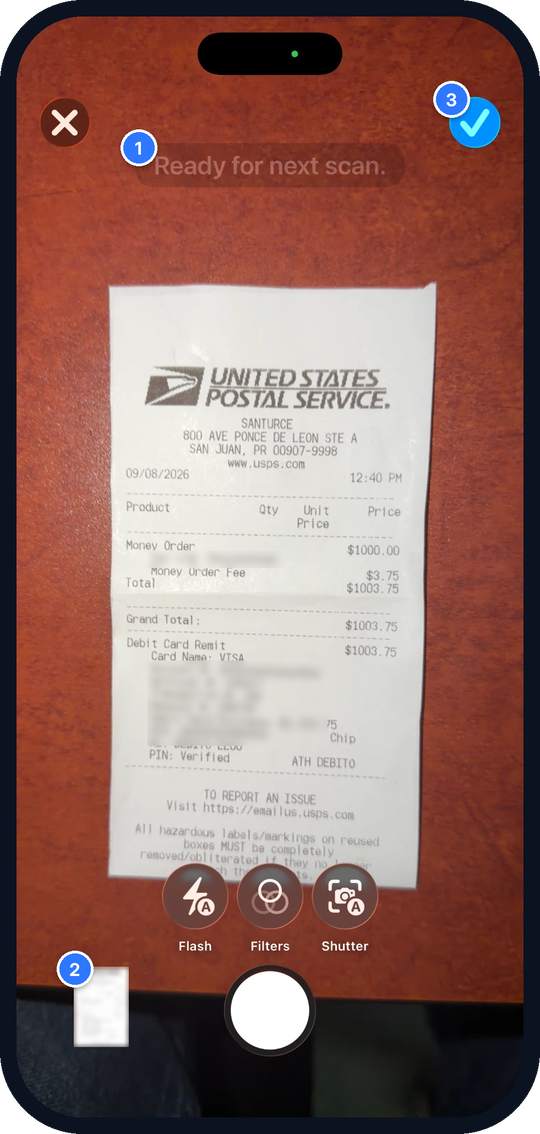
- Ready for next scan — the photo was taken
- Your scanned pages — tap to review
- Done — continue to the details
If the photo is blurry, ReceiptWorks tells you before reading it. Tap Retake — a retake doesn't use another scan — or Use anyway.
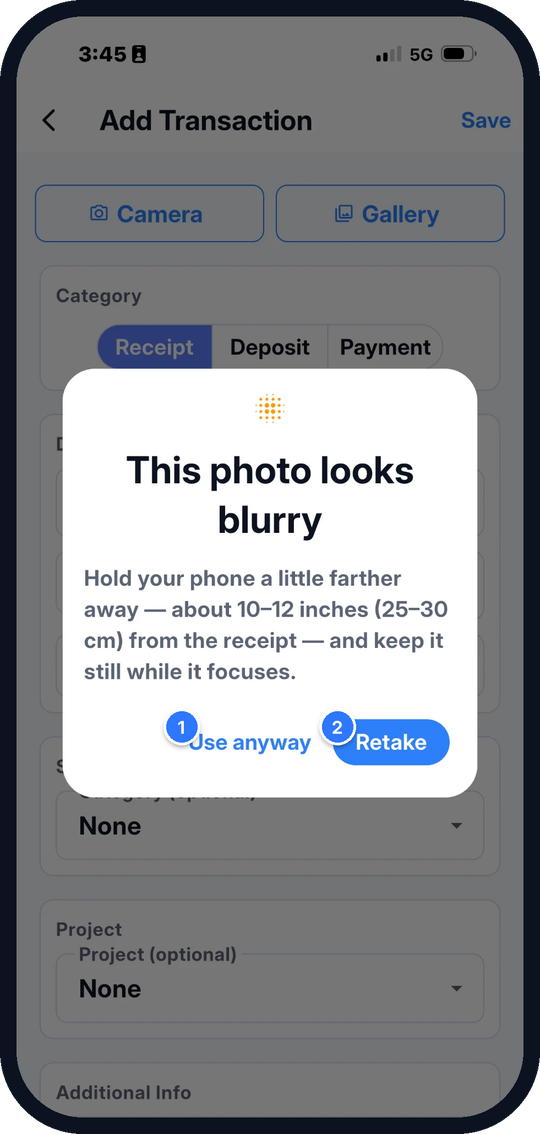
- Use anyway — keep this photo
- Retake — doesn't use another scan
4. Adding a photo from your gallery
- Tap Gallery and pick a photo.
- On iPhone, the receipt's edges are detected automatically. Drag any corner to adjust, then tap Done. (On Android, the document scanner handles this.)
- If the photo is blurry, choose Choose another or Use anyway.
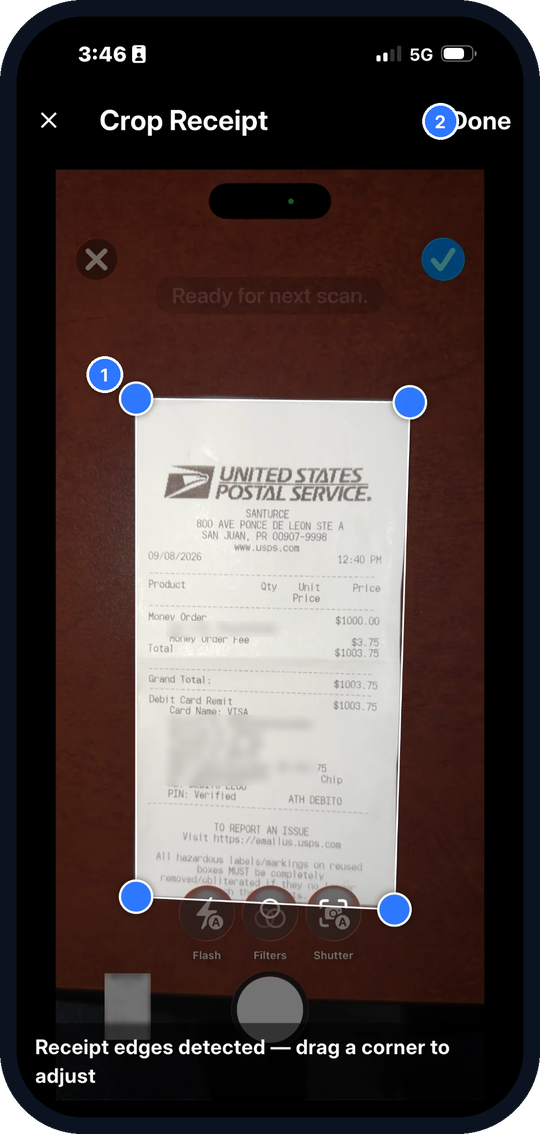
- Drag any corner to adjust the edges
- Done
5. Reviewing and saving
After a scan, ReceiptWorks fills in the details for you:
| Field | Filled in automatically |
|---|---|
| Vendor / payee | The store or company name |
| Amount | The total, including tax and tip |
| Date | The receipt's date |
| Currency | From symbols like €, £, kr or codes like EUR |
| Card / account | The last 4 digits, when printed |
| Check number | For payments |
Always check every field before saving — automatic reading is very good, but not perfect. Then choose a spending category, optionally a project, add a comment, and tap Save.
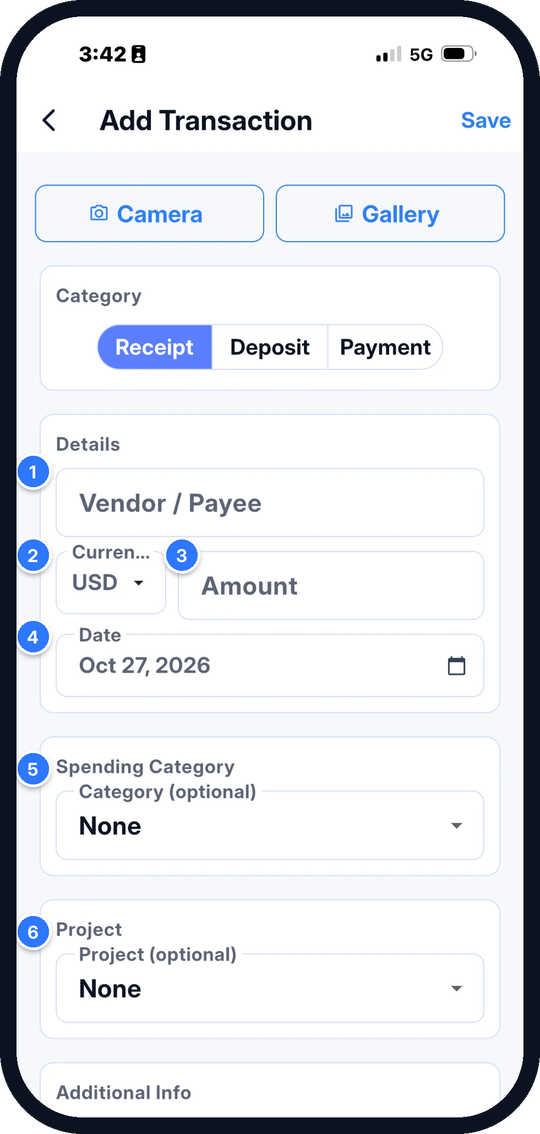
- Vendor / Payee — read from the receipt
- Currency — detected from €, £, EUR…
- Amount — the total
- Date — the receipt's date
- Spending category — choose one
- Project (optional)
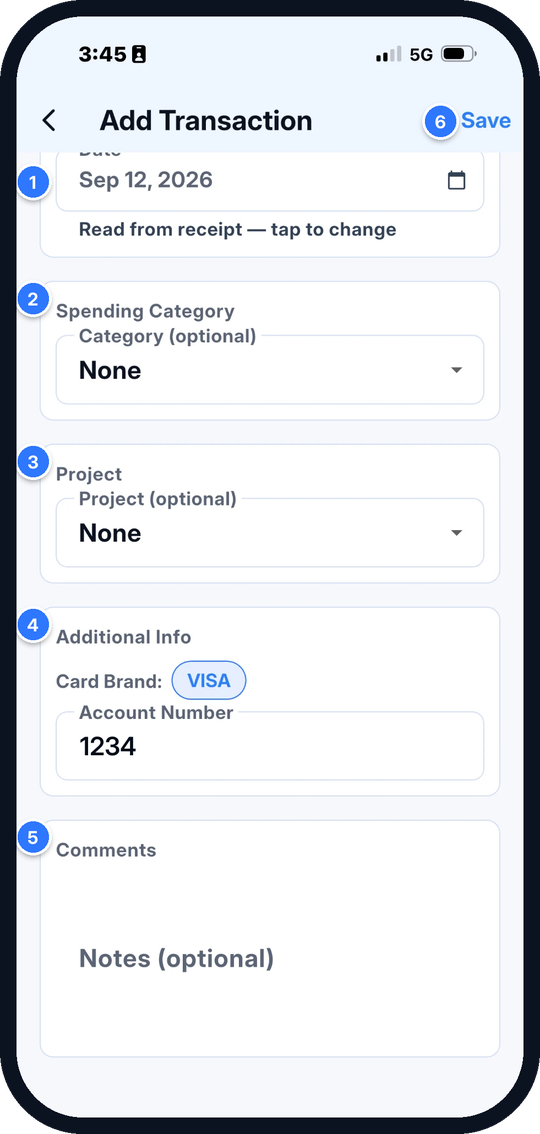
- Date read from the receipt — tap to change
- Spending category
- Project
- Card brand and last 4 digits
- Comments
- Save
AI reading (optional). The first time you scan, ReceiptWorks asks whether to use AI to read hard receipts. If you allow it, only the text read from the receipt is sent — never the photo. Choose No Thanks to read everything on your phone only.
More pages. Long receipts or invoices can have more than one image — tap the camera or gallery again while editing.
6. Viewing a transaction
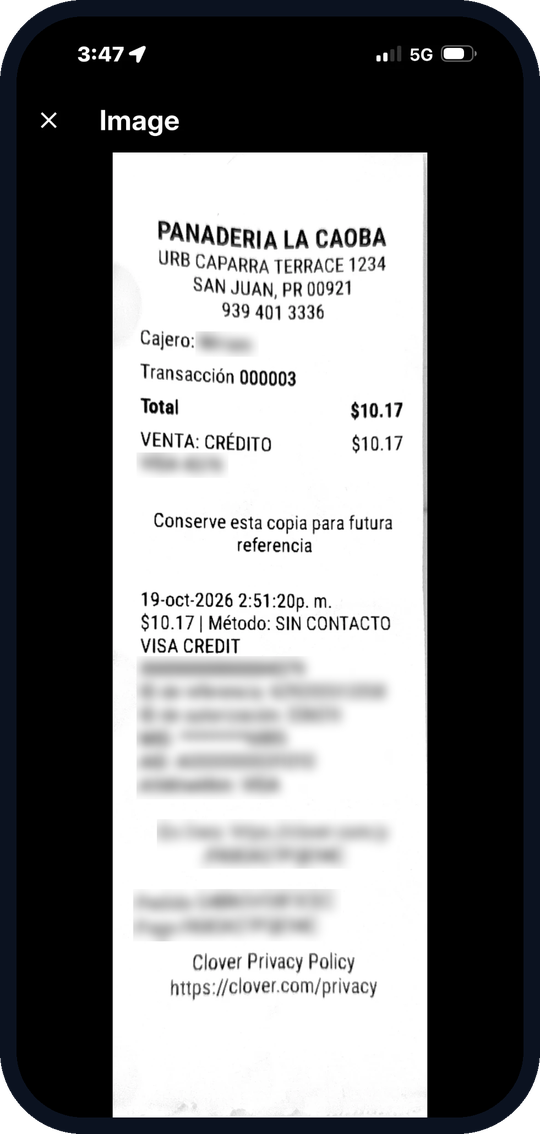
Tap any transaction to see its details and images. Tap an image to view it full screen — pinch to zoom, double-tap to fit, and X to close. Tap Edit (the pencil) to change anything or move it to another workspace.
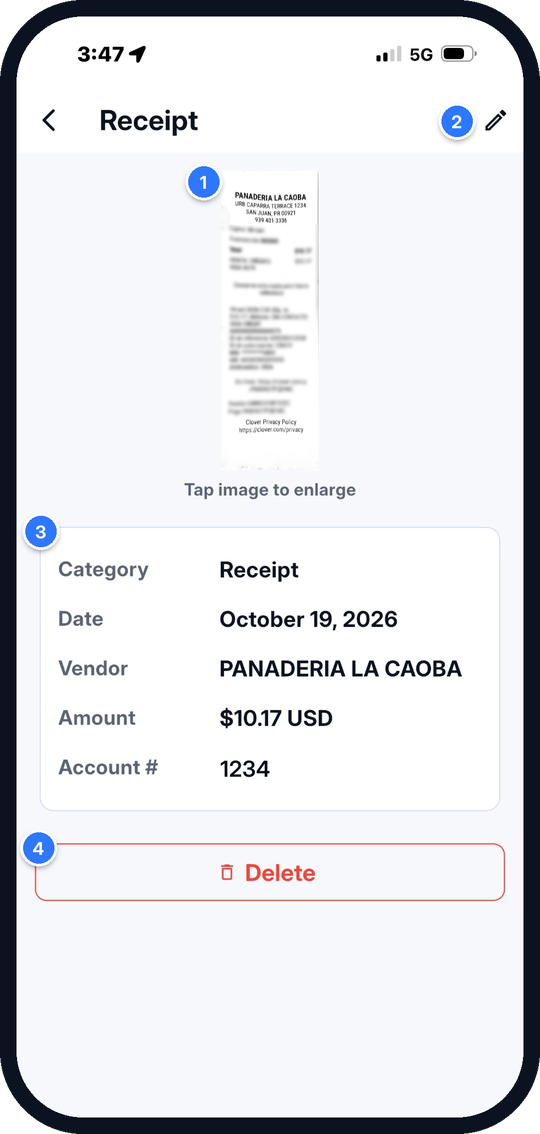
- Tap the image to enlarge
- Edit
- The saved details
- Delete
7. Currencies
- Set your Base Currency in Settings → Currency. Totals and reports use it.
- Each transaction keeps its own currency. When a receipt shows one (€, £, EUR…), it's selected automatically.
- The exchange rate for the receipt's date is filled in for you, and you can edit it.
- Totals that mix currencies are marked ≈ because they use converted amounts.
8. Workspaces and projects
- Workspaces keep records separate — for example, one per business, or business and personal.
- Projects group transactions inside a workspace — a job, a trip, a renovation.
- Open them from the buttons at the top of Transactions or from Settings.
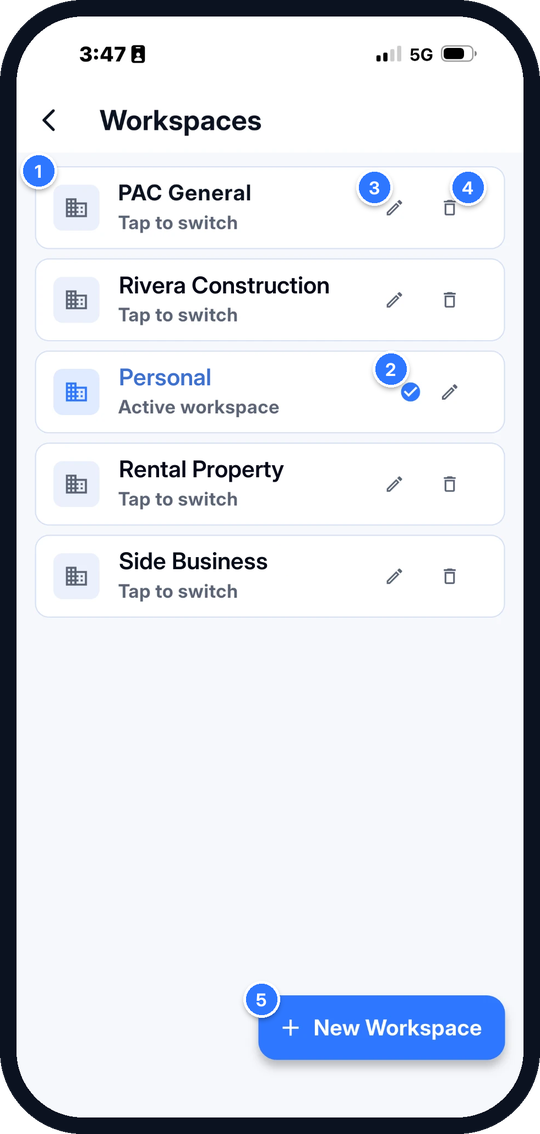
- Tap a workspace to switch to it
- The active workspace
- Rename
- Delete
- New Workspace
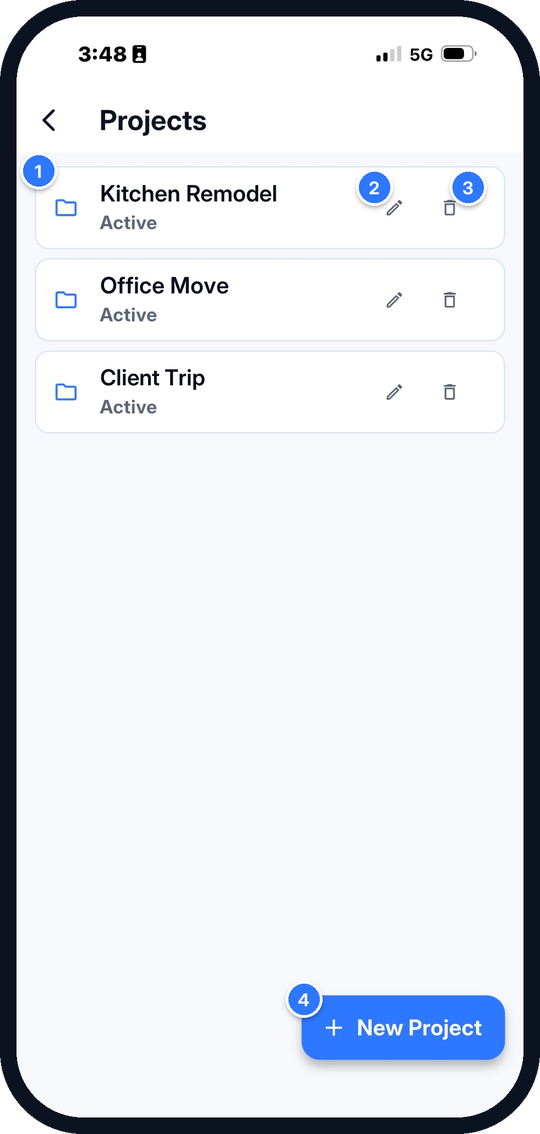
- A project
- Rename
- Delete — its transactions go back to the workspace
- New Project
9. Search and charts
- Search by store, amount, or notes in the box at the top of Transactions. With more than one workspace, tap Search all workspaces to find anything, anywhere.
- Filters narrow the list by type, spending category, project, and date.
- The Analytics tab shows your spending as charts — weekly, monthly, or yearly.
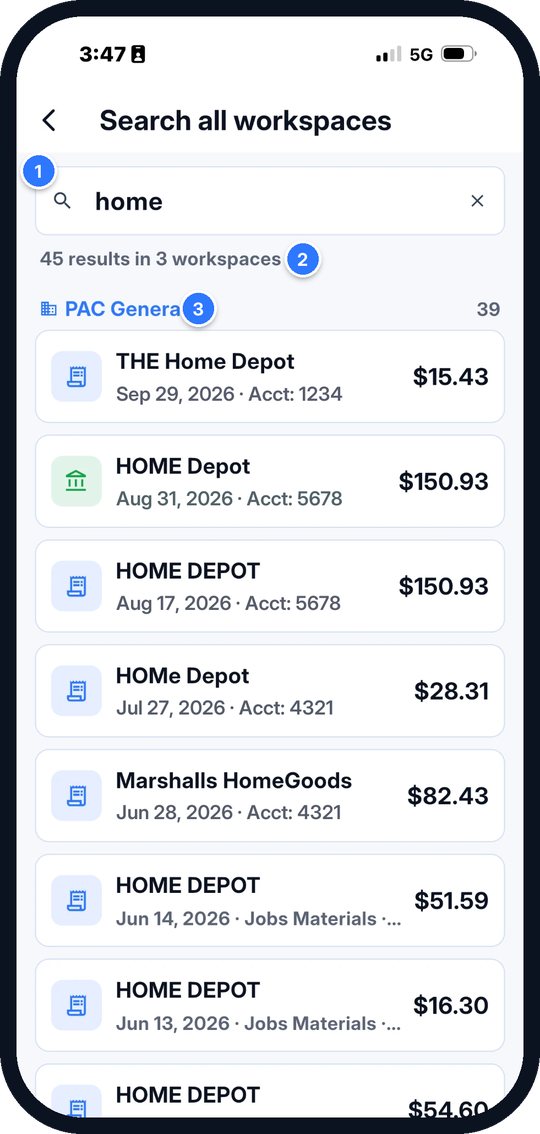
- Type a store, amount, or note
- Number of matches
- Results grouped by workspace
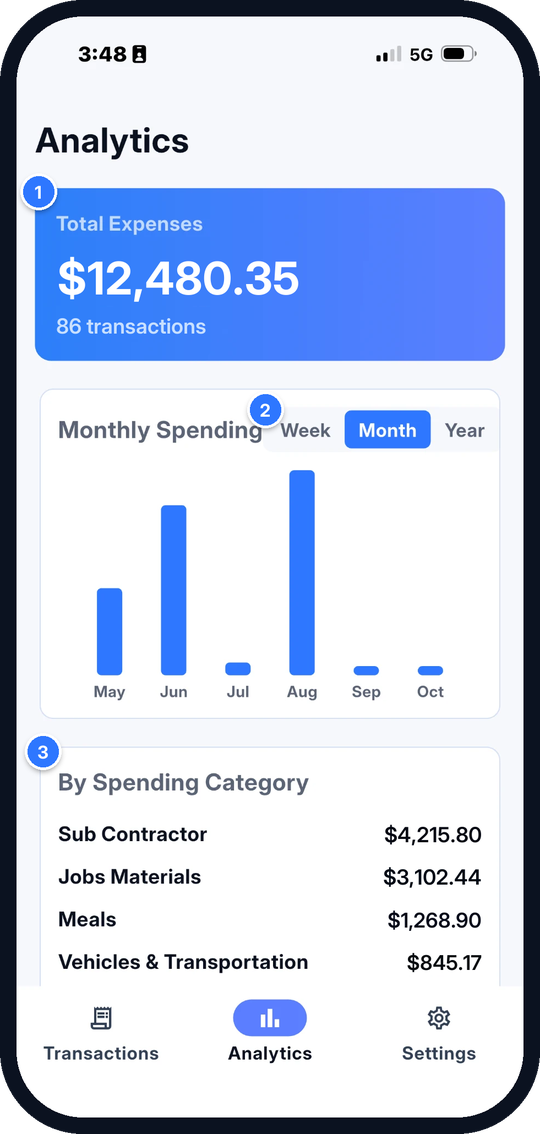
- Total expenses and number of transactions
- Week, Month, or Year
- Spending by category
10. Exporting reports
Tap Export at the top of Transactions. Reports follow your current filters, and every report can be shared, saved, or printed.
| Report | Best for |
|---|---|
| PDF report | Sharing or printing — includes receipt images and your company logo |
| CSV file | Excel, Google Sheets, or your accountant — includes currency, rate, and base-currency amount |
| Tax Summary PDF | Spending by category with Schedule C references (for information only — not tax advice) |
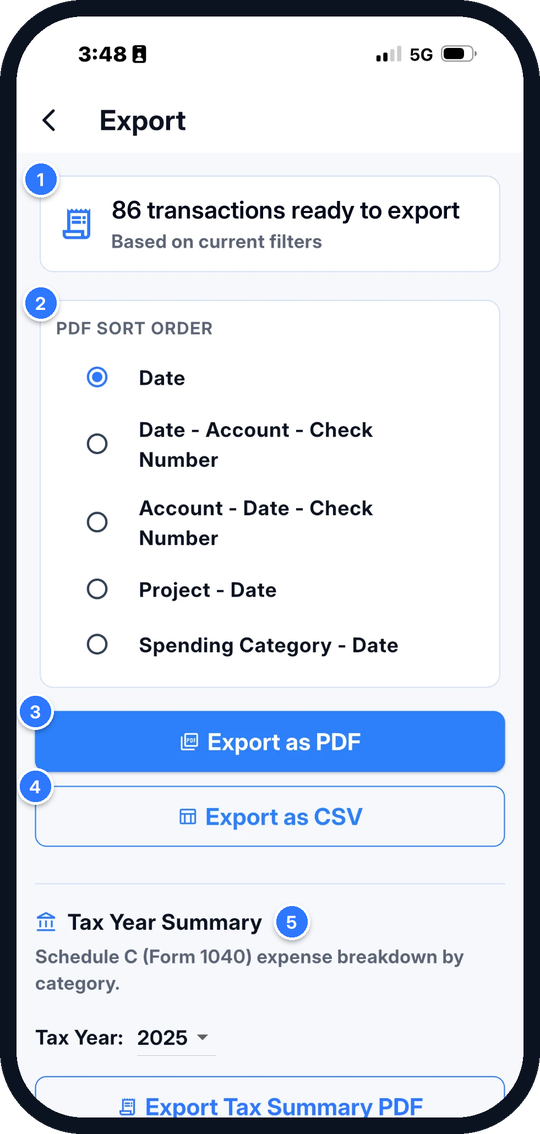
- How many transactions will be exported (follows your filters)
- Sort order for the PDF
- Export as PDF
- Export as CSV
- Tax Year Summary (Schedule C)
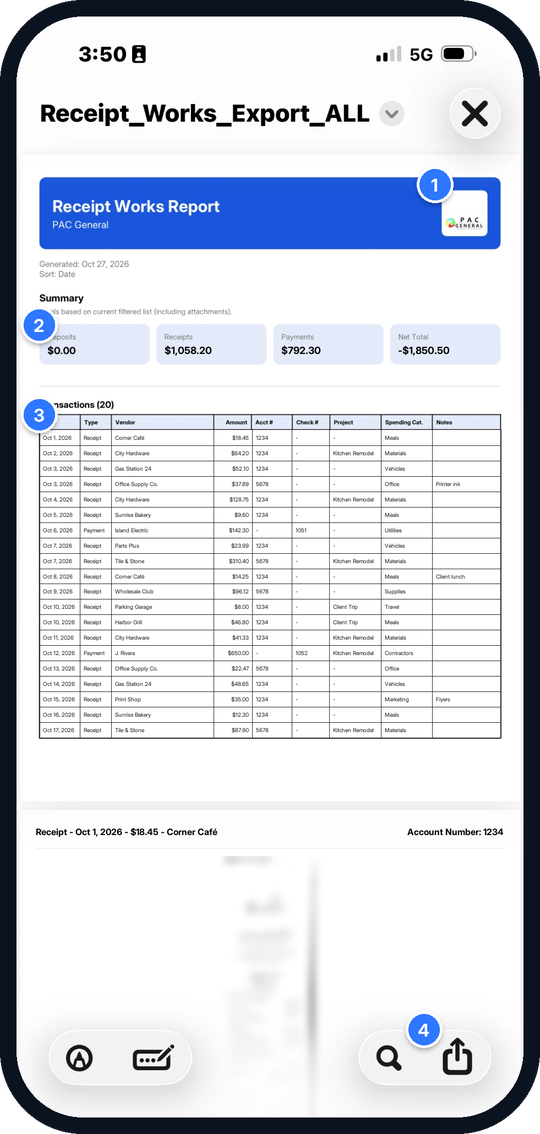
- Your logo (Settings → Workspace Branding)
- Summary totals
- The transaction table
- Share, save, or print
11. Free trial and ReceiptWorks Pro
| Free trial | ReceiptWorks Pro | |
|---|---|---|
| Scans | 20 | Unlimited |
| Exports | 1 | Unlimited |
| Account needed | No | Yes — Google or email |
| Where records are kept | On your phone | Backed up to the cloud and synced |
| Devices | This phone | Up to 2 |
- Subscribe from Settings — monthly or annual. You'll sign in or create an account as part of subscribing, and the app offers to move your trial records into your account.
- Already subscribed on another phone? Sign in, then tap Restore Purchases.
- Subscriptions renew automatically. Manage or cancel them in your App Store or Google Play account settings.
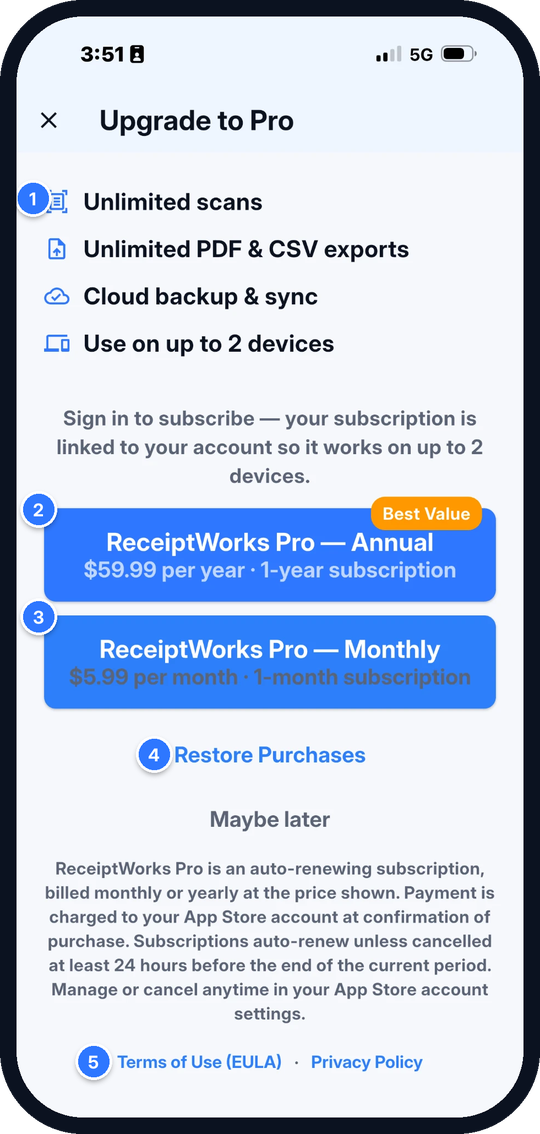
- What Pro includes
- Annual plan
- Monthly plan
- Restore Purchases
- Terms of Use and Privacy Policy
12. Settings, devices, and backup
- Pro works on up to 2 devices signed in to your account. On a third device you'll be asked which one to remove.
- See and remove devices in Settings → Manage Devices.
- New phone or reinstalled the app? Sign in, and your records come back from the cloud.
- Add your logo and company name to reports in Settings → Workspace Branding.
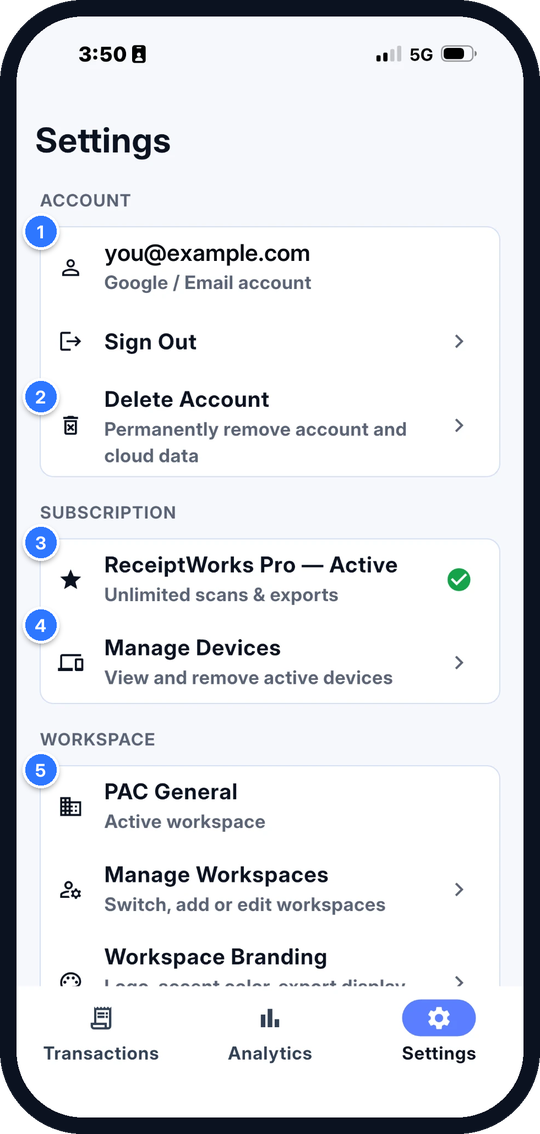
- Your account
- Delete Account
- Subscription status
- Manage Devices
- Your workspace and branding
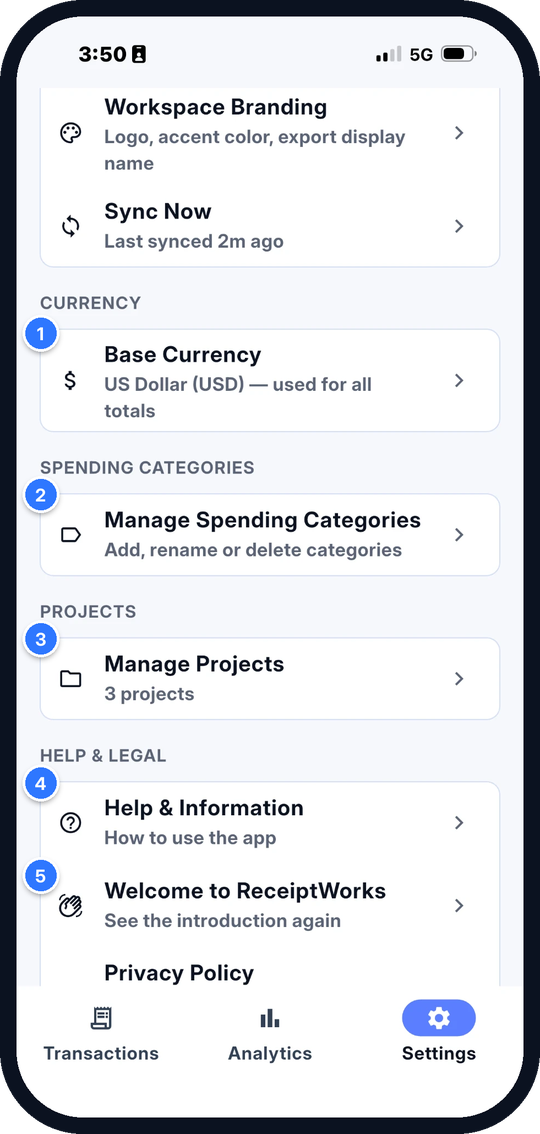
- Base Currency
- Spending categories
- Projects
- Help & Information
- Welcome to ReceiptWorks — the introduction again
13. Privacy and your account
- No ads, no tracking, and we never sell your data.
- Text recognition, blur checks, and edge detection run on your phone.
- Delete your account anytime in Settings → Delete Account. This deletes your cloud records and photos. Cancel any subscription separately in your store settings. You can also email help@receiptworkspr.com.
- Full details: receiptworkspr.com/privacy-policy-1.
14. Frequently asked questions
How far should I hold my phone?
About 10–12 inches (25–30 cm). Closer than that, the camera can't focus.
Why does it say my photo is blurry?
Every photo is checked before reading. Retake it (camera) or choose another (gallery), or use it anyway.
A field was read wrong. What do I do?
Tap it and correct it before saving — or open the transaction later and tap Edit.
Is my receipt photo sent to an AI service?
No. If you allow AI reading, only the text is sent, and it isn't stored.
Does a cancelled camera scan use one of my free scans?
No — a scan counts only when a photo is actually taken.
How do I cancel my subscription?
In your App Store or Google Play account settings. Deleting the app or your account doesn't cancel it.
Can I use it in Spanish or with other currencies?
Yes — it reads English and Spanish receipts and more than 30 currencies.